Tampilkan postingan dengan label Debian. Tampilkan semua postingan

Selasa, 25 Januari 2011

Konfigurasi Router Debian Lenny

Setelah berhasil menginstall debian lenny 5.04. Selanjutnya kita akan mengkonfigurasi Router. Silahkan ikuti langkah berikut :

* Kata2 yang bercetak tebal adalah perintah yang dijalankan pada komputer server.
* Kata2 yang berwarna merah adalah yang harus anda ubah atau buat.

1) pico /etc/network/interfaces
# The primary network interface
allow-hotplug eth0
iface eth0 inet static
address 192.168.1.1
netmask 255.255.255.192
network 192.168.1.0
broadcast 192.168.1.63
gateway 192.168.1.62
# dns-* options are implemented by the resolvconf package, if installed
dns-nameservers 192.168.1.62
dns-search situstkj.co.cc

# The secondary network interface
auto eth1
iface eth1 inet static
address 172.16.1.62
netmask 255.255.255.192
network 72.16.1.0
broadcast 172.16.1.63

2) /etc/init.d/networking restart

3) pico /etc/sysctl.conf

# Uncomment the next line to enable packet forwarding for IPv4
net.ipv4.ip_forward=1


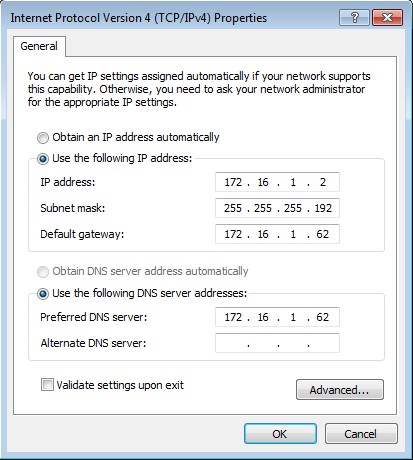
4) iptables -t nat -A POSTROUTING -o eth0 -j MASQUERADE
5) iptables -t nat -n –L

Chain PREROUTING (policy ACCEPT)
target prot opt source destination


Chain POSTROUTING (policy ACCEPT)
target prot opt source destination
MASQUERADE all -- 0.0.0.0/0 0.0.0.0/0


Chain OUTPUT (policy ACCEPT)
target prot opt source destination


6) iptables-save > /etc/network/iptables.conf
7) echo "iptables-restore < /etc/network/iptables.conf" >> /etc/network/if-up.d/iptables"
8) pico /etc/network/if-up.d/iptables

#!/bin/sh
iptables-restore < /etc/network/iptables.conf
9) chmod +x /etc/network/if-up.d/iptables


10) reboot
11) ifconfig | less
eth0 Link encap:Ethernet HWaddr 00:0c:29:32:97:44
inet addr:192.168.1.1 Bcast:192.168.1.63 Mask:255.255.255.192
inet6 addr: fe80::20c:29ff:fe32:9744/64 Scope:Link
UP BROADCAST RUNNING MULTICAST MTU:1500 Metric:1
RX packets:5 errors:0 dropped:0 overruns:0 frame:0
TX packets:82 errors:0 dropped:0 overruns:0 carrier:0
collisions:0 txqueuelen:1000
RX bytes:400 (400.0 B) TX bytes:3660 (3.5 KiB)
Interrupt:19 Base address:0x2000

eth1 Link encap:Ethernet HWaddr 00:0c:29:32:97:4e
inet addr:172.16.1.62 Bcast:172.16.1.63 Mask:255.255.255.192
inet6 addr: fe80::20c:29ff:fe32:974e/64 Scope:Link
UP BROADCAST RUNNING MULTICAST MTU:1500 Metric:1
RX packets:148 errors:0 dropped:0 overruns:0 frame:0
TX packets:100 errors:0 dropped:0 overruns:0 carrier:0
collisions:0 txqueuelen:1000
RX bytes:12617 (12.3 KiB) TX bytes:9610 (9.3 KiB)
Interrupt:16 Base address:0x2080

lo Link encap:Local Loopback
inet addr:127.0.0.1 Mask:255.0.0.0
inet6 addr: ::1/128 Scope:Host

12) iptables -t nat -n –L

Chain PREROUTING (policy ACCEPT)
target prot opt source destination
Chain POSTROUTING (policy ACCEPT)
target prot opt source destination
MASQUERADE all -- 0.0.0.0/0 0.0.0.0/0
Chain OUTPUT (policy ACCEPT)
target prot opt source destination


(Jika terdapat kata Masquerade all berarti konfigurasi Anda Sudah Berhasil)

13) Kita check koneksinya. Pada windows ubah Settingan TCP/IP Menjadi Seperti ini:
IP Address : 172.16.1.2
Subnet Mask : 255.255.255.192
Default Gateway : 172.16.1.62
Preferred DNS Server : 172.16.1.62

14) Setelah settingan diubah, Bukalah Command Prompt computer client dan cek koneksi ke server.
C:\Users\antoro>ping 172.16.1.62
Pinging 172.16.1.62 with 32 bytes of data:
Reply from 172.16.1.62: bytes=32 time<1ms TTL=64
Reply from 172.16.1.62: bytes=32 time=1ms TTL=64
Ping statistics for 172.16.1.62:
Packets: Sent = 4, Received = 4, Lost = 0 (0% loss),
Approximate round trip times in milli-seconds:
Minimum = 0ms, Maximum = 1ms, Average = 0ms


C:\Users\antoro>ping 192.168.1.1
Pinging 192.168.1.1 with 32 bytes of data:
Reply from 192.168.1.1: bytes=32 time=1ms TTL=64
Reply from 192.168.1.1: bytes=32 time<1ms TTL=64
Ping statistics for 192.168.1.1:
Packets: Sent = 4, Received = 4, Lost = 0 (0% loss),
Approximate round trip times in milli-seconds:
Minimum = 0ms, Maximum = 1ms, Average = 0ms

15) Jika Reply, Maka konfurasi router anda bisa dikatakan berhasil.

Konfigurasi Web Server Debian Lenny

Setelah berhasil Mengkonfigurasi DNS Server Selanjutnya kita akan mengkonfigurasi Web Server. Pada setting kali ini akan sangat mudah, karna hanya membutuhkan beberapa langkah saja. Silahkan ikuti langkah berikut:

* Kata2 yang bercetak tebal adalah perintah yang dijalankan pada komputer server.
* Kata2 yang berwarna merah adalah yang harus anda ubah atau buat.


1) apt-get install apache2 php5
2) pico /etc/apache2/sites-available/default (Tambahkan pada baris terakhir)

ServerAdmin antoro@situstkj.co.cc
ServerName www.situstkj.co.cc
ServerAlias situstkj.co.cc
DocumentRoot /var/www/


3) /etc/init.d/apache2 restart
Restarting web server: apache2 ... waiting .

4) pico /var/www/index.html


www.situsTKJ.co.cc berhasil


5) Buka browser komputer client dan masukkan url www.situstkj.co.cc anda akan melihat tampilan ini:

Konfigurasi WebMail Server Debian Lenny


Setelah berhasil Mengkonfigurasi Web Server Selanjutnya kita akan mengkonfigurasi Webmail Server. Pada setting kali ini akan sangat memerlukan ketelitian. Silahkan ikuti langkah berikut:

* Kata2 yang bercetak tebal adalah perintah yang dijalankan pada komputer server.
* Kata2 yang berwarna merah adalah yang harus anda ubah atau buat.


1) apt-get install postfix squirrelmail courier-imap courier-pop
Create directories for web-based administration : NO
Local only : OK
General type of mail configuration : Internet Site
System mail name : situstkj.co.cc

2) pico /etc/apache2/apache2.conf
# Include the virtual host configurations:
Include /etc/apache2/sites-enabled/
Include /etc/squirrelmail/apache.conf


3) pico /etc/squirrelmail/apache.conf
# users will prefer a simple URL like http://webmail.example.com
#
# DocumentRoot /usr/share/squirrelmail
# ServerName webmail.example.com
#

DocumentRoot /usr/share/squirrelmail
ServerName mail.situstkj.co.cc

* Jangan ubah / hapus baris yang lainnya.

4) /etc/init.d/apache2 restart
Restarting web server: apache2 ... waiting .

5) Buka browser komputer client dan masukkan url mail.situstkj.co.cc anda akan melihat tampilan ini:


6) maildirmake /etc/skel/Maildir
7) adduser antok
8) adduser anisa
9) dpkg-reconfigure postfix
Local only : OK
General type of mail configuration : Internet Site
System mail name : situstkj.co.cc
Root and postmaster mail recipient : (kosongkan)
Other destinations to accept mail for (blank for none) : 172.16.1.0/26 (<- tambahan baris terakhir)
Force synchronous updates on mail queue : No
Local networks : 172.16.1.0/26
Use procmail for local delivery : NO
Mailbox size limit (bytes) : 0
Local address extension character : +
Internet protocols to use : ipv4

10) pico /etc/postfix/main.cf

inet_interfaces = all
inet_protocols = ipv4
home_mailbox = Maildir/


* Jangan ubah / hapus baris lainnya.

11) /etc/init.d/postfix restart
Stopping Postfix Mail Transport Agent : postfix.
Starting Postfix Mail Transport Agent : postfix.

12) /etc/init.d/courier-imap restart
Stopping Courier IMAP server : imapd.
Starting Courier IMAP server : imapd.

14) /etc/init.d/courier-pop restart
Stopping Courier POP3 server : pop3d.
Starting Courier POP3 server : pop3d.

15) Buka Browser PC client anda. Masukkan url "http://mail.situstkj.co.cc" Setelah itu silahkan email2an Jika berhasil maka konfigurasi WebMailserver anda sukses.

Konfigurasi FTP (File Transfer Protocol) Debian Lenny

Setelah MengKonfigurasi WebMail Server, Sekarang kita akan belajar mengkonfigurasi FTP Server. Hanya diperlukan beberapa Langkah untuk mengkonfigurasi FTB server tersebut.

*Kata2 bercetak tebal adalah perintah yang harus dijalankan.
*Kata2 berwarna merah adalah perubahan/sesuatu yang harus anda buat.

1) apt-get install proftpd
Run proftpd : standalone

2) pico /etc/proftpd/proftpd.conf

# Includes DSO modules
Include /etc/proftpd/modules.conf

# Set off to disable IPv6 support which is annoying on IPv4 only boxes.
UseIPv6 off

# If set on you can experience a longer connection delay in many cases.
IdentLookups off
ServerName "antoro.situstkj.co.cc"
ServerType standalone
DeferWelcome off


3) /etc/init.d/proftpd restart
Stopping ftp server: proftpd.
Starting ftp server: proftpd.

4) Buka browser komputer client dan buka url ftp://www.situstkj.co.cc anda akan melihat tampilan ini:

Anda bisa login menggunakan username antok, ataupun username anisa, yang sudah anda buat pada saat
konfigurasi mail server tadi.

Konfigurasi Proxy Server Debian Lenny

Setelah MengKonfigurasi FTP Server, Sekarang kita akan belajar mengkonfigurasi Proxy Server. Menurut saya ini adalah konfigurasi yang sangat membutuhkan ketelitian. So, Becarefull with your step..!

*Kata2 bercetak tebal adalah perintah yang harus dijalankan.
*Kata2 berwarna merah adalah perubahan/sesuatu yang harus anda buat.

1) apt-get install squid
2) rm /etc/squid/squid.conf
3) pico /etc/squid/squid.conf
acl all src all
acl localnet src 172.16.1.0/26
acl situs url_regex -i "/etc/squid/blokir.txt"
http_access deny situs
http_access allow localnet
http_access allow all
http_port 3128 transparent
cache_mem 8 mb
memory_replacement_policy heap GDSF
cache_replacement_policy heap LFUDA
store_dir_select_algorithm round-robin
cache_dir aufs /cache 10000 24 256
cache_store_log none
cache_access_log /var/log/squid/access.log
cache_effective_user proxy
cache_effective_group proxy
visible_hostname proxy.situstkj.co.cc

Konfigurasi DHCP Server Debian Lenny

Konfigurasi DHCP Server Debian Lenny

Sebelumnya, selamat bagi anda yang telah berhasil Mengkonfigurasi Proxy Server. Langkah terakhir yang akan kita lakukan adalah mengkonfigurasi DHCP Server.. Silahkan ikuti langkah berikut:


* Kata2 yang bercetak tebal adalah perintah yang dijalankan pada komputer server.
* Kata2 yang berwarna merah adalah yang harus anda ubah atau buat.

1) apt-get install dhcp3-server
Non-authoritative version of DHCP server OK

2) pico /etc/dhcp3/dhcpd.conf
# option definitions common to all supported networks...
option domain-name "situstkj.co.cc";
option domain-name-servers antoro.situstkj.co.cc;

# If this DHCP server is the official DHCP server for the local
# network, the authoritative directive should be uncommented.
authoritative;

# A slightly different configuration for an internal subnet.
subnet 172.16.1.0 netmask 255.255.255.192 {
range 172.16.1.2 172.16.10.61;
option domain-name-servers 172.16.1.62;
option domain-name "situstkj.co.cc";
option routers 172.16.1.0;
option broadcast-address 172.16.1.63;
default-lease-time 600;
max-lease-time 7200;
}


* Untuk kata yang tidak saya cantumkan, jangan diubah/dihapus.


3) Reboot
4) Sambil menunggu komputer server hidup kembali. Ubah settingan TCP/IP di client windows menjadi:


5) Kemudian ping dari komp windows ke komp server.
C:\Users\antoro>ping 172.16.1.62
Pinging 172.16.1.62 with 32 bytes of data:
Reply from 172.16.1.62: bytes=32 time<1ms TTL=64
Reply from 172.16.1.62: bytes=32 time=1ms TTL=64
Ping statistics for 172.16.1.62:
Packets: Sent = 4, Received = 4, Lost = 0 (0% loss),
Approximate round trip times in milli-seconds:
Minimum = 0ms, Maximum = 1ms, Average = 0ms
C:\Users\antoro>ping 192.168.1.1
Pinging 192.168.1.1 with 32 bytes of data:
Reply from 192.168.1.1: bytes=32 time=1ms TTL=64
Reply from 192.168.1.1: bytes=32 time<1ms TTL=64
Ping statistics for 192.168.1.1:
Packets: Sent = 4, Received = 4, Lost = 0 (0% loss),
Approximate round trip times in milli-seconds:
Minimum = 0ms, Maximum = 1ms, Average = 0ms
6) Check mulai dari DNS, Web, Mail, Ftp, Proxy. Jika bisa, berarti konfigurasi anda berhasil.

Konfigurasi DNS Server Debian Lenny (5.0)

Untuk mengkonfigurasi DNS Server menggunakan linux debian versi 5.0, ikuti langkah langkah dari gambar berikut:

1 Sebelum konfigurasi, kita Install Paket Bind-nya

2. Kemudian masukkan DVD-1 dan tekan “Enter”. Maka akan tampak gambar sbg berikut.


3. Lalu kita pindahkan posisi kita ke /etc/bind/


4. Lalu masukkan perintah berikut.


5. Lalu edit menjadi seperti ini.


6. Lalu edit file “named.conf.options”


7. Lalu edit file tsb


8. Masukkan perintah berikut.


9. Edit file “db.antoksmkn1”


10. Ubahlah agar menjadi seperti ini:


11. Kemudian Editlah file “db.172.16.1”


12. Editlah agar menjadi seperti ini:


13. Edit file /etc/resolv.conf


14. Edit mjd spt ini


15. Setelah itu, restart paket bind nya. Jika Starting domain name service “failed” . Maka ada kesalahan dlm Penulisan anda. Cek dari awal.!


16. Jika sudah kita jalankan perintah nslookup berikut :


15. Lalu kita cek apakah DNS server kita sudah berhasil atau belum. Masuk ke windows. Lalu klik start-run-cmd.
Lalu ketikkan perintah “nslookup”, sama seperti di server. :


16. Jika sudah Nampak seperti gambar berikut. Maka anda sudah berhasil dalam konfigurasi DNS

server.
17. Lalu kita akan mengecek konfigurasi Router dan DNS Server kita secara keseluruhan. Bukalah komp
client (windows) anda, lalu buka browser. Namun sebelummnya pastikan IP di windows anda sudah
anda setting dengan benar dan antara computer windows dan computer yang terinstall debian sudah
terhubung menggunakan kabel cross. Lalu silahkan browsing, jika berhasil maka anda benar-benar
berbakat dalam hal ini.

Instalasi Debian Lenny

1. Pilih Install

2. Pilih English


3. Pilih Other


4. Pilih Asia


5. Pilih Indonesia


6 Pilih American English


7. Pilih eth0


8. Tekan Cancel


9. Pilih Configure Network Manually


10. Isikan IP address


11. Isikan Netmask


12. Isikan Gateway.


13. Isikan Nameserver. (DNS)


14. Isikan hostname.


15. Isikan Nama Web Lokal


16. Pilih Jakarta


17. Pilih Guided – Use entire disk


18. Pilih nama harddisk


19. Pilih All files in one partition….


20. Pilih Finish


21. Pilih Yes


22. Masukkan root password


23. Masukkan lagi.


24. Masukkan Full Name User


25. Masukkan Username


26. Masukkan Password untuk user.


27. Masukkan lagi.


28. Pilih No.


29. Pilih No


30. Pilih No


31. Pilih Standard System saja


32. Pilih Yes.


33. Pilih Continue


34. Login Sebagai Root, dan masukkan password.
Dan selesai..!

Related Posts Plugin for WordPress, Blogger...